Revisiting React Rendering
An introduction on how a render occurs in React, and a few tips on optimizing them.


Hey folks, after preparing for frontend interviews/giving several interviews, a set of questions and discussions around React and React performance kept coming up. I decided to distill some of those concepts here for everyone's benefit. In this article, let's talk about React Rendering: How it happens and what affects it.
If you prefer learning these concepts in a video format, there's a link to a talk I gave on the same topic below.
Link to code: https://github.com/akash-joshi/react-native-blr
Idea 1 - What are the Steps involved in a React Render?
The steps involved in a React render are as follows -
1. Code
The user first writes their original code as JSX, or as React.createElement calls (if they dare).
2. Bundling
The bundling process involves transpilation, code conversion and other steps. If the code was written using JSX, it's transpiled to JS using React.createElement calls, which the React library can then parse. Any imported svg and css files are also converted into a usable format and embedded into the final code.
This bundling generally happens through a bundler like [webpack](https://webpack.js.org/), or any other bundler you or your React framework are using.
3. Virtual DOM Generation
The Virtual DOM, or VDOM, as it's generally called, is an abstract tree representation of what the final DOM structure on the browser should look like. Creating a DOM node is a very expensive process, so React uses the VDOM and changes between VDOM structure across renders to determine which DOM node to update and how to update it.
React is also, of course, also responsible for creating and destroying DOM nodes as it needs to.
4. Generating the real DOM
React determines which DOM nodes to create, update or destroy by comparing the difference between 2 Virtual DOMs. This process is known as reconciliation and it's constantly being updated and improved by the React team.
In summary, the last 2 steps can be divided into 2 phases of the React renderer at a higher-level:
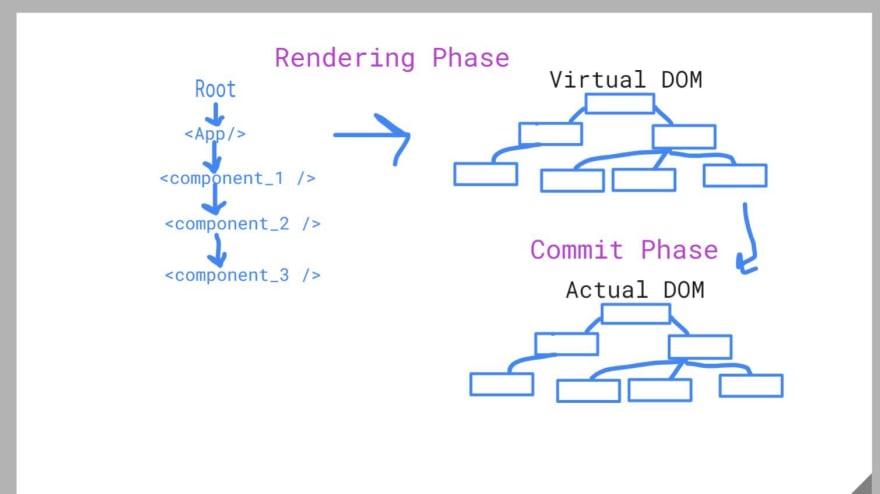
Image by Simran Birla
1. Render Phase
The render phase involves generating a VDOM tree from the bundled React code. Each VDOM state is immutable. Hence, a new VDOM tree is generate for each React render.
2. Commit Phase
As discussed in point 4 above, once React determines via reconciliation that a DOM node needs to be updated, it goes ahead and does so. The main job of React is in trying to minimize "commits" as much as possible, hence minimizing DOM node updates, and hence keeping your webapp performant.
You can check this part out in my talk here.
Link to code.
Idea 2 - How does React identify DOM Nodes? How can one optimize lists?
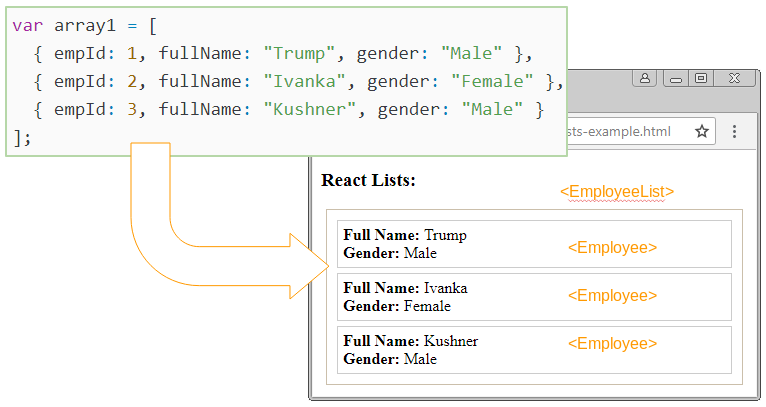
React holds a reference to the DOM Node structure in each element's Fiber Node, Fiber being the current implementation of React's reconciliation algorithm. Because of this, a developer generally doesn't have to worry about providing unique references for each DOM Node to React.
However, in structures like list, the order of React elements might change arbitrarily. To maintain a one-one mapping for the order of DOM Nodes inside of React and the browser, it's recommended to pass a key prop which uniquely identifies a React element inside of a list.
This key prop helps React in reusing DOM Nodes as much as possible, and hence, reduces the number of DOM updates required between renders.
If the key being passed to DOM Nodes in a list is not unique, your app may start breaking in unexpected ways.
To see me build a list and slowly start breaking it, watch the talk from this point.
Link to code.
Note: An interesting topic to learn more about is Virtualization. Here's how one can render a very large list, while reusing the same DOM nodes in React - Virtualization in React
Idea 3 - How to Remount Components in a simple way
This topic builds upon the previous topic. So if you haven't read it yet, I recommend going through it once, and all the links within.
Since the key property of a React element is used to uniquely identify it, a change in the value of key triggers a remount of the element and hence, the DOM node, since React expects that the element itself has changed.
Since a remount is triggered, all of the element's and its child components' state are also reset, and any effects are run again.
This can be used whenever you want to quickly force a remount on a component, either to rebuild a component, or just reset its state, in the case of forms. Hence, you can quickly reset a form, and all its enclosing state and components by changing the value of key being passed to it.
To see a visual demo of me building a form and resetting it, watch the talk from here.
Link to code example.
Idea 4 - Why do useState and useEffect exist?
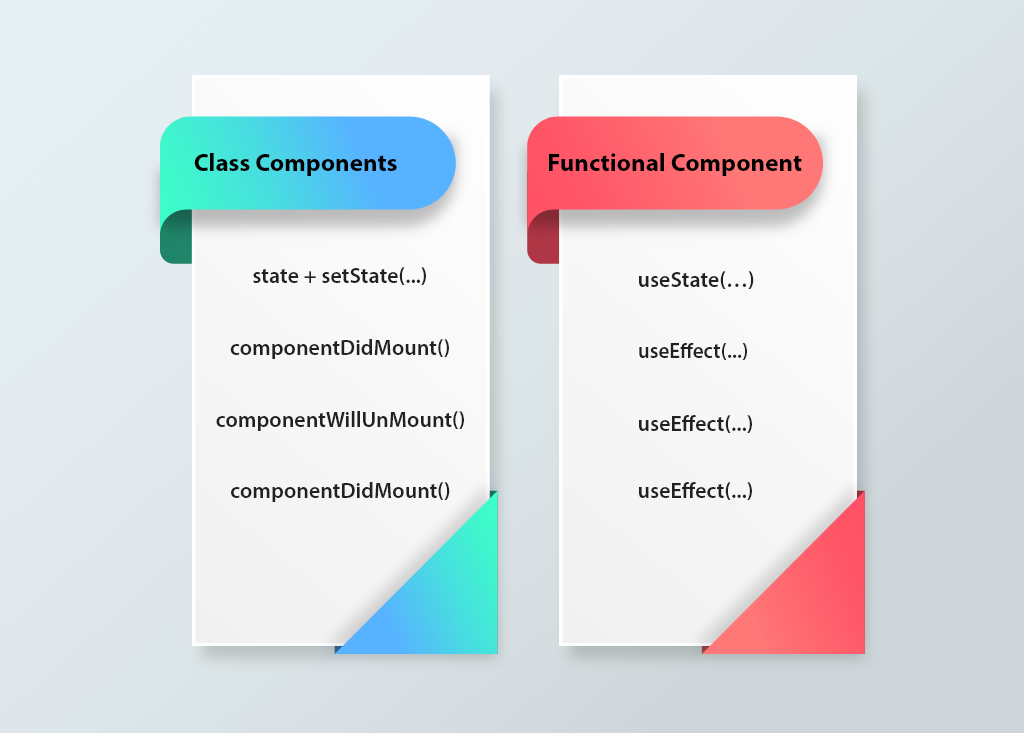
Image from Bacancy Technology
Before React Hooks using functional components were introduced in 2018, the standard way of building React components was via Class Components. While defining reactivity in Functional components is as simple as using the useState hook to define reactive state, and defining effects in useEffect, it works differently in Class components. Primarily -
- State was defined in the constructor and was a combined object of all the state that a component needs to keep a track of and react to.
- Reacting to state was done as a part of class lifecycle methods.
One needed to make an explicit comparison between the previous and present state to know when to run effects like network calls. However, this creates an implicit dependency between state variables and effects, which reduces code readability, and can lead to unexpected behavior for effects.
The primary solution for this problem are the useState and useEffect hooks. Here's how:
useStateexplicitly defines which variable should cause a React component to re-render on change.useEffectallows a user to define explicit dependencies between state and effects. For eg, one can create an explicit dependency for fetching a user's data, when auserIdstate variable changes.
Through these explicitly defined dependencies between effects and state, the code is less likely to become spaghetti and becomes easier to read. There are no code examples for this part of the topic, but feel free to go through all of the linked documentation above.
Bonus: Rerender Cascades and how to Prevent them
Did you know that updating the state of a React component causes the component and all its children to rerender? Even if they don't depend on that state?
Don't be surprised, because this is expected behavior. In fact, React also provides developers with an easy way of preventing this, if one wishes to do so (via React.memo).
If you liked this article, I would appreciate it if you could share it around. In a future article, I'll do a deep dive into state, the context API, memoization, and when to use which of these. Subscribe to my tiny newsletter to be notified via email when I put out something interesting.